German Sd.kfz 7/1 20mm Flakvierlin
The Sd.Kfz. 7 was a half-track military vehicle used by the German Army, Luftwaffe and Waffen-SS during the Second World War. Sd.Kfz. is an abbreviation of the German word Sonderkraftfahrzeug, "special purpose vehicle".
That's easy for you to say.
Then they stuck an AA gun on it...
...Or more precisely four guns...
- The Sd.Kfz. 7 was armed with a 2 cm Flakvierling 38 L/65 quadruple anti-aircraft gun mounting.

You have to admit it looks really cool. I think so.

Appearing with both open and armored cab. 750-800 were produced by the end of December 1944.Thank you Wikipaedia.
I built this many years ago and I thought it was a wonderful value for money model. I still think it's great value for money. Lots to do, vehicle and figures, lots of diorama potential, reasonable price, you can't go wrong.
Could I say that it would be an ideal adult beginners model? (I don't think beginners models should be easy. I think they should be fun.) Notice also that I do make the distinction between adult and younger beginners and that though I say this could be ok for beginners, I'm not suggesting its as a starter kit. (Get a 1/35 panzer II)
Good image on the box. Plenty of information there for while you are building your model.
Told you it looks cool...
Useful information on the end panels for while we are choosing.
13 pounds, 16 dollars. How great is that?
More images on the long side. I'll be doing the autumn camo on the troops so I'll do the basic grey this time. Everyone does the whitewash..
Unusually, I have only done one of these, the Matilda.
Grey camouflage design on the underside. It's really effective. Can't see anything here.
Here's one I built in the days of black and white photos...
Let's open the box...
A motor cycle courier tries to jump over a German Sd.kfz 7/1 20mm Flakvierling. Interesting diorama idea. Maybe another time.
So, what do we get?
I really don't mind the elastic band tracks so these look fine. The lower hull looks ok too.
Wheels. Lots of wheels...
The body and the figures.
The figures are in white plastic but the uniform is reversible and I went with the autumn camo.
Suspension and engine covers.
The 4x4 flack.
Tires and metal axels.
The little screw is for tensioning the tracks.
Paper and ink.
As is common for these Tamiya models we have the two sets of instructions one in Japanese and one in English.
Tamiya Instructions are generally easy to follow. I do sometimes wander about to make brush painting easier but if you follow the instructions you will be fine.Let's have a look inside.
Let's look at the plastic au natural.
Rubber tyres and metal fixings.
The body
The wheels
The substructure and engine area.
The shooty bit.
The peeps.
All things considered, it's a good kit
Time to put plastic together.
The Sd.Kfz.7/1 Flakvierling 38.
The Sd.Kfz.7/1, was born shortly after the 2cm Flakvierling 38 was presented to Adolf Hitler in October 1939. The Luftwaffe ordered 100 such weapons systems to be mounted on the Sd.Kfz.7 chassis. Production started in February 1940 and continued until December 1944, by which time between 750 and 800 were manufactured.
Let's put some plastic together. But first, a basecoat of grey.
Putting the guns together.
Even as the Flak 30 was entering service, the Luftwaffe and army branches of the Wehrmacht had doubts about its effectiveness, given the ever-increasing speeds of low-altitude fighter-bombers and attack aircraft. The Army in particular felt the proper solution was the introduction of the 37 mm calibre weapons they had been developing since the 1920s, which had a rate of fire about the same as the Flak 38 but fired a round with almost eight times the weight. This not only made the rounds deadlier on impact, but their higher energy and ballistic coefficient allowed them to travel much longer distances, allowing the gun to engage targets at longer ranges. This meant it could keep enemy aircraft under fire over longer time spans.
The 20 mm weapons had always had weak development perspectives, often being reconfigured or redesigned just enough to allow the weapons to find a use. it was no surprise when Rheinmetall introduced the 2 cm Flakvierling 38, which improved the weapon just enough to make it competitive again. The term Vierling literally translates to "quadruplet" and refers to the four 20 mm autocannon constituting the design.
.JPG)

.JPG)


It looks a good'un.

The Flakvierling weapon consisted of quad-mounted 2 cm Flak 38 AA guns with collapsing seats, folding handles, and ammunition racks.
Each of the four guns had a separate magazine that held only 20 rounds. This meant that a maximum combined rate of fire of 1,400 rounds per minute was reduced practically to 800 rounds per minute for combat use – which would still require that an emptied magazine be replaced every six seconds, on each of the four guns.
However, automatic weapons are typically limited to roughly 100 rounds per minute per barrel to give time for the heat to dissipate, although this can be exceeded for short periods if the firing window is brief.
The gun was fired by two pedals — each of which fired two diametrically opposite barrels — in either semi-automatic or automatic mode. The effective vertical range was 2,200 metres. It was also used just as effectively against ground targets as it was against low-flying aircraft.
We'll come back to the gun later. It's time to begin the thing it sits on.
A base of German grey and then I'll pick out the tyres in a very dark grey.

a.JPG)
The usual process. Remove the parts trim and sand.
This is a wheel. These are wheels too.
And slowly we build up the substructure including the winch and suspension..
Steering was achieved using the front two wheels. These were air-filled rubber wheels that were steered using the steering wheel in the driver’s cabin. The tracks could also be powered separately in order to help turning, but this was used only if the steering wheels were insufficient. The front wheels had a leaf-spring suspension.
Add a little bit of early weathering.
The metal screw will be used to tension the tracks.
The rubber tires will need cleaning up with a bit of emery. I'll leave it a bit rough too.
More wheels... They keep on coming...
Simply follow the instructions and hey presto!
I'll touch up when we are complete.
Time for the body. The engine compartment went together well enough though I did need a little filler here and there.
I painted the drivers area now while the access was good.
Netting around the gun...
Fairly straight forward. I secured mine with PVA white glue.
The tractor could tow loads up to 8,000 kg (17,600 lb) in weight. Most were fitted with a winch that could pull up to 3450 kg. It had a payload of 1800 kg. The windscreen was able to fold down and a canvas roof could be erected.
And now for the tracks.
And this is what it looks like with a touch of weathering.
Put it together and do you have?
The Maybach HL62 TUK, six-cylinder petrol engine drives the running gear consisted of two front wheels with hydro-pneumatic tires for steering and a track each side with 14 road wheels—7 per side, overlapping and interleaved. A drive sprocket was located at the front of each track system. Minor variations on the track and road wheel design and manufacture took place throughout the course of service, some being combined in the field as repairs took place. In 1943, the Maybach HL62 engine was replaced with a Maybach HL64.
A quick look at what we have so far.
Better put the gun on.
The 2cm Flakvierling 38
The Flakvierling 38 anti-aircraft mount system was introduced into service in 1940. It was developed by the Mauser company for the Kriegsmarine at first but was then adopted by the Wehrmacht in order to provide an anti-aircraft system with a better rate of fire. It consisted of four 2cm Flak 38 AA guns mounted together, two on each side. This allowed the Flakvierling to put up four times more bullets in the same amount of time compared to the single Flak 38, thus increasing the chances of severely damaging enemy airplanes.
Inadvertently, this also made the gun quite potent against ground targets, as it was able to saturate enemy positions with fire.

There was no central loading system and each gun had its own 20 round magazine. The magazines were mounted on the sides of the system. When the system was at 0 degrees elevation, the magazines were horizontal.
The guns had a maximum range of 4.7 km and a maximum altitude range of 3.7 km. The combined maximum rate of fire of the 4 guns was 1800 rounds per minute, but this was usually closer to 800 rpm in operation, as the guns needed to be reloaded after they finished their magazines. It could take as little as 3 seconds to fire off all four magazines. Special compartments for the magazines were present on either side of the mount, rotating along with the whole system. The gun barrels could be removed for cleaning.
Let's jump over to the final part where I shall add the figures and put the whole on a base.
The Sd.Kfz.7/1 Flakvierling.
The story so far...
This is going well...
Continuing my Sd.Kfz.7/1 Flakvierling project.
It's time to populate the model with some people. Here's where we got to so far.


There was no central loading system and each gun had its own 20 round magazine. The magazines were mounted on the sides of the system. When the system was at 0 degrees elevation, the magazines were horizontal.
The guns had a maximum range of 4.7 km and a maximum altitude range of 3.7 km. The combined maximum rate of fire of the 4 guns was 1800 rounds per minute, but this was usually closer to 800 rpm in operation, as the guns needed to be reloaded after they finished their magazines. It could take as little as 3 seconds to fire off all four magazines. Special compartments for the magazines were present on either side of the mount, rotating along with the whole system. The gun barrels could be removed for cleaning.

No fewer than 10 men were needed to crew the Sd.Kfz.7/1, with a driver, a commander and 8 gun servants, oh and the man who takes care of the plants...
Better start building...
.JPG)
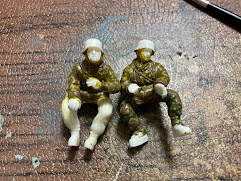
The figures reflect their age but as you will see build up quite satisfactorily.
First they will need constructing and quite a bit of cleaning, a little filling and a little sculpting to strengthen the details.
I'll try to get a little variation in the clothing just because... well in real life there was variation.


Using different colours to build up the camo pattern.
Using different shades to build up the skin tones.
Not forgetting the gloves and boots...It's cold out there.
Touch up the details and we are done.


Line up for a photo boys . Say cheese in German...
All aboard... Let's make sure we can all get on.
Now you see me...
Cup of tea 11 o'clock.
And now, the completed model. I'm happy with it but what do you think?
Putting the lid on and I am finished.

.JPG)


.JPG)
.JPG)

.JPG)
.JPG)

.JPG)
.JPG)
.JPG)
.JPG)

.JPG)
.JPG)

.JPG)


.JPG)

.JPG)


a.JPG)
.JPG)
.JPG)
.JPG)
.JPG)


.JPG)
a.JPG)
.JPG)
.JPG)

.JPG)
.JPG)

.JPG)

.JPG)
.JPG)
.JPG)

.JPG)

.JPG)

.JPG)
.JPG)
.JPG)
.JPG)
.JPG)


.JPG)
.JPG)

.JPG)


.JPG)
.JPG)


.JPG)
.JPG)
.JPG)
.JPG)

.JPG)
.JPG)
.JPG)


No comments:
Post a Comment