Republic P-47D Thunderbolt. Hasegawa 1/72. Constructing a little beast. Peeking under the lid.The Republic P-47D Thunderbolt. Hasegawa 1/72. Constructing a little beast.
Let's put stuff together.
Pre-painting.
I like pre-painting where I can. It makes getting into those difficult areas easier. Oh how many times did I learn that lesson?
Building the cockpit.
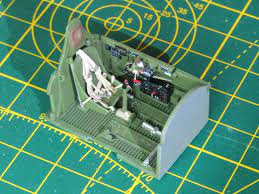
Extensive cockpit build of 3parts. Remember the days of an Airfix series one cockpit. A man stuck on two stalks of plastic?
Removing parts from the sprue.
I always leave a little material on the part to clean up along with the mold lines.
Trimming the tag with my knife and then a bit of emery cloth.
Research is easy with the internet.
The Hasegawa model has limited detail in the canopy but with a quick search we find inspiration to make little improvements.
Very basic addition of a bit of card using PVA. No real pretentions to brilliance. But I know the level I am aiming for.
Bit of paint. That looks ok. I don't expect great visibility inside the cockpit once we are finished.
Spoilers. Not a lot to see here.
The P-47 had a large, all-metal, semi-monocoque fuselage that was constructed mainly from aluminum. The fuselage was divided into several sections, including the cockpit, engine compartment, and tail section. It featured a distinctive bubble canopy for improved visibility.
It will fly better with wings.

The Thunderbolt had a low-wing configuration with a straight wing design. The wings were also made of aluminum and featured a single-spar construction. They were mounted with four .50 caliber machine guns and could carry external stores such as bombs or rockets.
Cleaning up the parts. This is a preliminary stage, just removing the bulk. I'll finish up properly when the parts are together
 Don't forget to dry fit.
Careful with the knife when you are cleaning. I'm ok because I'm a Samurai and used to blades.
Clean up and a coat of silver paint.
The construction of the P-47 involved several stages. It started with the fabrication of individual components such as the fuselage sections, wings, tail surfaces, and engine. These components were then assembled on the production line, where workers would join them together, install the engine, landing gear, cockpit instruments, and armament.
Powerplant: The P-47 was powered by a Pratt & Whitney R-2800 Double Wasp radial engine, one of the most powerful engines of its time. The engine had 18 cylinders arranged in a double-row configuration and provided the Thunderbolt with exceptional speed and climbing performance.
Wheels.
Time for the decals.
Trim off the excess carrier film and soak in warm water until the decal slides from the backing.
I don't have decal solutions, so I use a bit of diluted PVA to secure the decals.
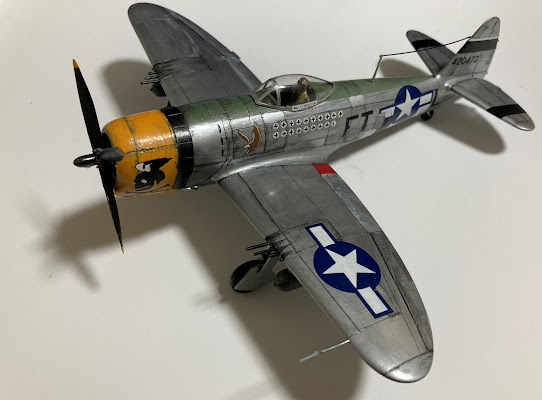
All done. Ready for the final touches.
The nose has had four coats of this damn paint.
I used the knife to chip the paint on this occasion.
Then a bit of weathering to finish.
The decal can go on the cowling now.
Stretching sprue for the aerial.
Armament:
The P-47 was heavily armed with a combination of machine guns and external stores. The standard armament included eight .50 caliber Browning machine guns, four in each wing. The Thunderbolt could also carry up to 2,500 pounds (1,130 kg) of bombs or other external stores under the wings and fuselage.
Fashion show time.
What do you think folks?


Comments
Post a Comment